

Below is the recommended setup for sites with single AP.
There is a known issue with this setup for sites having multiple APs, particularly with user experience as one user moves from one AP to another. There is totally no handover from one AP to another as the user devices is NAT’d per AP, so as mover moves to another AP, the user may need to manually connect again to the wireless network and enroll itself to the new AP.
For multiple AP setup, best practice is to use Bridge Mode.
============
NAT mode with Meraki DHCP allows a MR Access Point to provide client addressing by running its own DHCP server to simplify management, allow guest access, and provide client isolation functionality.
Client Addressing in NAT mode with Meraki DHCP
The DHCP server run by the Cisco Meraki AP provides addresses in the 10.0.0.0/8 subnet (10.x.x.x). Outbound connections will be initiated with the LAN IP address of the AP using Network Address Translation. Wireless clients that connect to the network will be given the following configuration via Meraki DHCP:
- An IP address in the 10.x.x.x range. The IP address is created by running the client’s MAC address through a hashing algorithm.
- A gateway address of 10.128.128.128
- A DNS address of 10.128.128.128
A wireless network using NAT Mode with Meraki DHCP can be seen below. When clients on the wireless network access resources upstream of the AP, their IP addresses will be translated to the IP address of the AP (192.168.1.1):
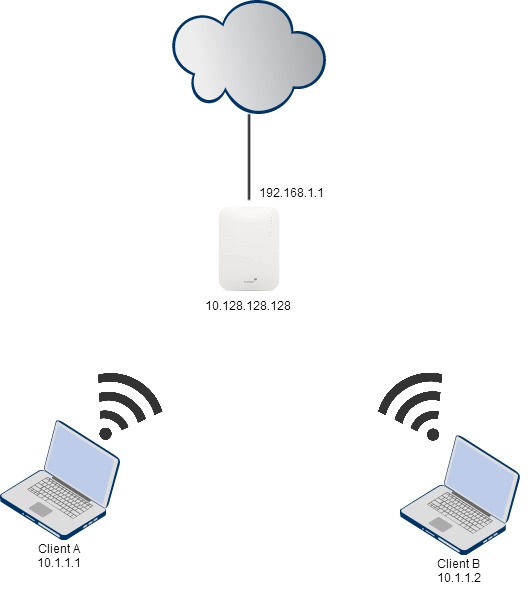
Client Isolation
NAT mode with Meraki DHCP isolates clients. Devices with a Meraki DHCP address will be able to access external and internal resources, such as the Internet and LAN (if firewall rules permit). However, connected clients will be unable to contact each other. The client isolation features of Merkai DHCP can be seen above in Figure 1. Client A and Client B can both access the Internet. When Client A wants to send traffic to Client B, the traffic will reach the AP. However, the AP will not forward this traffic to Client B. Therefore, the two clients are isolated from each other.
Since the client isolation function of NAT mode prevents wireless devices on the SSID from communicating with other wireless devices, NAT mode is not recommended for use with wireless peer-to-peer devices like a wireless printer or Google Chromecast.
Configuring NAT mode with Meraki DHCP
To configure NAT mode with Meraki DHCP on an SSID, follow the directions below:
- Navigate to Configure > Access control.
- Select the appropriate SSID from the SSID menu at the top of the page.
- Change the Client IP Assignment to NAT mode: Use Meraki DHCP under the Addressing and traffic section, as seen in the image below.
- Click Save Changes.

Common Problems
There are a few common problems that can arise when deploying NAT mode with Meraki DHCP to provide client addressing. These problems are outlined in detail below:
- Roaming – NAT mode with Meraki DHCP will use the IP address of the AP as the public IP address for wireless clients. When a client roams between APs with Meraki DHCP, TCP connections will drop and have to be re-established. This can cause problems with some applications and devices.
- Bonjour and multicasting protocols – The client isolation features of Meraki DHCP will prevent wireless clients from communicating with each other. This will prevent Bonjour, layer 2 discovery protocols, and multicasting protocols from working. This can cause problems in networks that use Bonjour among wireless clients, or have IP phones or applications that require multicasting.
- Inbound client connections – NAT mode with Meraki DHCP prevents inbound connections to a wireless client. This can cause problems if a wireless client needs to be accessible from a different network. The image below illustrates this problem. A connection, such as a remote desktop session, from the wired client to wireless client A will fail. Other common examples include failed wireless LAN connections to Chromecast devices, AirPlay enabled devices, printers or projectors.

The issues described above can be resolved by using bridge mode for client addressing. Bridge mode simply passes traffic between the wireless client and wired distribution system. An upstream DHCP server will be required to handle client addressing.
